Showing posts with label terrain. Show all posts

Tuesday, June 5, 2018

Gary Con X: Beren and Luthien escape from Angband, First Age: 466

As mentioned in the previous post, I attended Gary Con X this past March. While most of my time was spent running games, I squeezed in a bit of tabletop wargaming. Orc’s Drift has already been covered, but the second game I played in was near-and-dear to my Middle-earth-loving heart. It was a scenario based on the story of Beren and Luthien, specifically the flight to Doriath following their escape from Angband. It was one of the final events of the con and well-worth the wait.

The scenario used the Chainmail rules rather than the SBG, but was otherwise a wonderful chance to get some Middle-earth miniature gaming done on the road. The referee and scenario designer was Kevin Cabai, a Tolkien fan and an experienced wargamer. He really knows how to construct a Middle-earth miniatures battle that is both entertaining and steeped in Tolkien’s work.

The premise was the Beren and Luthien were almost to Doriath, but the forces of Morgoth were closing in. To protect his daughter, Thingol and his allies take to the field beyond the Girdle of Melian, forcing the servants of Morgoth to engage them. The delay may allow Beren and Luthien to reach safety. Beren and Luthien used hidden movement rules (movement was tracked on paper and known only to the player controlling the duo and the referee) and Angband employed orc trackers to try and pinpoint their location on the board. In the meanwhile, the orcs, wargs, and trolls of Angband marched on Doriath. Would Beren and Luthien reach safety or would the forces of evil extract vengeance and possibly reclaim the lost Silmaril?

I was on the Evil team for the scenario, placed in command of three units of trolls. After running games all weekend, bashing and lumbering was about all I could handle tactically, and I feel I did a good job commanding my forces. I’ve never had the pleasure of using the Games Workshop trolls on the table before, and even though we were playing Chainmail, it was still a great deal of fun to wade into a company of dwarves and start squashing them into jam.

My brutes also had the honor of slaying King Thingol, after being forced to slowly plod through dense woodlands when a unit of wargs cut off my advance. Stupid mutts. But our dogged patience was rewarded when we engaged with the High King of the Sindar and laid him low with a high roll of the dice. Not a bad way to end the last event of the convention.

Ultimately, evil scored a minor victory. Beren and Luthien were slain along with Thingol, but in the end, Carcharoth escaped with the Silmaril in his belly, granting the wolf the game.

A small farm. Are Beren and Luthien hiding within?

Orcs search the farm only to be delayed by tasty morsels, requiring them to lose a turn.

My trolls ignore the farm, eager for battle.

The Forces of Angband move towards Doriath as the hunt continues.

The Forces of Good enter the field to stop Morgoth's minions.

Warg riders and trolls clash with dwarves. The stubborn dwarves fought to the death, slowing my trolls' advance.

Engagements everywhere!

Still dealing with dwarves. Will this fight never end?!

Dwarves, elves, and orcs fight in the middle of the field.

Thingol (the Glorfindel model) leads his troops against a unit of wargs.

The trolls begin their long slog through the forest to reach Thingol.

At long last, we battle the Sindar king.

It was a short battle.

Saturday, February 10, 2018

BGiME #10: Making a Rohirrim Building

This is perhaps my favorite “Modelling Workshop” to date. Issue #10 provides detailed instructions on making low-cost but good-looking houses for Rohan. Their appearance, however, is generic enough to suit most Dark Ages or medieval periods, and they can easily pull double-duty as a Western European structure if your wargaming tastes lean towards the historical as well as Middle-earth.

The basic box shape of the house means you can use any rectangular object of the correct size as the building’s base. I followed the instructions and used some old tea boxes, but anything close to that scale would also work. If you’re overly ambitious, you could even build the base from scratch with heavy cardboard or foam board.

The roof “thatch” is ordinary spackle diluted down to a toothpaste consistency and painted on. Once laid down over the cardboard roof, lines are etched into the joint compound with a toothpick to give it the correct texture. Painted properly, the fake thatch looks fantastic and has so far proven durable.

I know later issues of Battle Games in Middle-earth demonstrate other methods of building Rohan structures, but I’d be surprised if you can make them for cheaper. It took me roughly a week of on-and-off building to create, texture, and paint these up. A long weekend of steady attention would probably suffice if you needed them faster. All in all, these are amazing terrain pieces. Combine them with the watch beacon from last issue and you have an eye-catching Rohan or Dark Age hamlet for your tabletop battles.

Under Construction: You can see the balsa wood trimmings and dried "thatch" roof ready for painting

Spackle covers the base to give it texture as well.

Painted with flocked base.

I like the horse-head roof emblems, but would probably make them from foam board or balsa wood if I had to do it again.

The doorknob is a drop of hardened white glue painted silver.

A good view of the "thatching."
Rear view.

Tuesday, January 2, 2018

BGiME #9: Constructing a Warning Beacon

This is a cool piece of terrain that was fun to build. The warning beacon has a lot of character and its presence in one's inventory of tabletop decor suggests many potential game ideas. It could summon reinforcements as it does in this issue's battle scenario. It could be an objective to be protected for X number of turns while a model frantically kindle the beacon. It could even be a pyre upon which a hapless model is to be burned alive unless he or she is rescued. All of these are intriguing uses of the terrain piece to liven up any tabletop battle.

The piece was easy to construct using materials I already had on hand. I built it along with some Rohan houses that also made an appearance in this issue's scenario. I'll post separate images of those when I cover the next issue. Please forgive the unattractive backdrop for this series of photos. I took them without much thought of posting them online and snapped them merely to brag to a friend about what I'd accomplished.


Sunday, November 26, 2017

BGiME #8: Trees and Forests

Trees are a wargaming table staple. No matter what system or period you prefer, you can always spruce (heheh) up the tabletop with trees. From lonely pines to small groves of oaks to full forests capable of hiding divisions, trees are the bee’s knees.

They’re also something I lack in my terrain inventory. I have a few I repainted and based from dollar store Christmas scene trees, but I need more. I’ve been waiting for the Battlefield in a Box woods to be manufactured again, but they seem to be on permanent pre-order. So I was enthusiastic at first about issue #8 demonstrating cheap and easy means to create tabletop trees.

I started in making them and I was satisfied with the first phases of the process. The twisted garden wire trunks—covered in masking table and spackle for texture—turned out great. Then came adding the foliage. I used the magazine’s suggestion of doing the foliage with sisal moss, a single package of which I found at the dollar store. The original moss was light tan in coloration, so I purchased a small can of green spray paint to give it the proper hue. 

The problem may be either that I didn’t have enough moss or that I did a poor job affixing it to the trees. Regardless of the reason, my end results weren’t quite equal to those show in the magazine. They’d serve in a pinch, but they’re not something I’m particularly proud to put down on the table. I’m chalking these up to a lesson learned and going to continue to keep my eyes peel for good-looking commercially made trees in a suitable scale.


Thursday, September 21, 2017

BGiME #7: Walls and Fences

What’s the point in having an issue dedicated to teaching the rules regarding defending walls if you don’t have some walls to defend? 

Issue #7 provides easy-to-follow directions for building walls and fences for your game table. The materials are cheap, the skill level is low (if not fool-proof, as we’ll see), and the result is as many obstacles as you could desire for your games. 

The walls are made from 6” sections of thick card glued together and topped with thin card. When you pay attention to what you’re doing, it works just fine. When you’re attention to detail is lacking, things go a little awry. When building one of my walls, I wasn’t precise in my cutting and that left a bump in the top of the wall. When I topped the wall with section of thin card, the result was a less than even finish. Not horrible, but a little more care on my part would have resulted in a better terrain.


The fences are made from balsa wood glued to a section of thin card. The uprights are placed first, then once the glue has dried, the crossbars are attached. A lot of dry brushing later and some flocking, and you’ve got yourself 6” of cheap fencing that looks fantastic. I’ll likely keep using my Pegasus Hobbies stone walls instead of these scratch built ones, but the fences have and will continue to see a lot of use in games.


That finishes off our look at issues #7. The issue’s promo blurb for #8 tells us we can look forward to new rules for missile weapons, a Legolas metal miniature, and techniques for making woods and forests. If this was back during Battle Games in Middle-earth’s original run, we’d have all that in two weeks. But I’ve got some painting and scratch-building to do, so we’ll get to issue #8 as soon as I can.

Friday, September 15, 2017

Battle Games in Middle-earth #7 Overview

After an overlong quiescence, it’s time to get back to working my way through the Battle Games in Middle-earth series. We pick things up with issue #7 and the introduction to the forces of Rohan.

The issue’s “Guide to Middle-earth” introduces us to the Rohirrim and the situation in Rohan. Given the clash between Rohan and Isengard is both one of the major battles of the War of the Ring and the main focus of an entire movie, it’s sensible to focus on the fight between Rohan and the Uruk-hai early in the Battle Games in Middle-earth series. Both Rohan and Isengard will see larger coverage in the issues ahead. The two pages following this issue’s “Guide” offer a sneak preview of future issues’ topics—including rules for various weapons, special fighting rules for Heroes, cavalry, a battle report of an actual game, new painting techniques, instructions for modelling trees and buildings, and look at the upcoming models to be included in these issues. Boromir, an Uruk-hai Captain, and Riders of Rohan are all headed our way!

“Playing the Game” covers rules for defending barriers, which will come in handy when Rohan decides to hold Helm’s Deep against Saruman. In short, any model standing on one side of a crossable obstacle, be it a wall, a ditch, a fence, or so forth, has a great advantage over any other model trying to cross it. The defending model is never moved back 1” if it loses a Fight roll, and it can Fight against multiple models in one-on-one battles if it’s holding the barrier. Models trying to strike a defender have to make in-the-way rolls if they win the Fight, meaning that each roll to wound has a 50% chance of hitting the barrier rather than the defender. In all cases, the best way to deal with a model defending a barrier is to send someone over it at an unprotected point and attack the defender from behind. This not only has a better chance of wounding the model, it might also move him away from the obstacle, allowing allied models to cross over.

Up next is this issue’s “Battle Game” section. The scenario is “Repel the Marauders!” and as can be imagined, it puts the rules for defending barricades to the test. The scenario pits a group of Rohan warriors against marauding Uruk-hai intent of killing defenseless Rohan villagers. The Rohirrim warriors must hold the walls and fences surrounding the village from the merciless servants of the White Hand long enough for the villagers to flee. 

The “Painting Workshop” provides the reader with a guide on how to paint this issue’s included models: 12 Warriors of Rohan. These models balance out the Uruk-hai we received back in issue #4 and, like the Uruk-hai, will serve as the core of a growing Good force for the reader’s collection of minis. Given the Warriors uniform color and limited palette, getting these guys ready for the gaming table should be a cinch. 

The issue closes out as always with the “Modelling Workshop” section. It should come as no surprise that walls and fences are the topic of this issue’s workshop. Instructions are provided for creating stone walls and wooden fences. A total of four of each will be needed for the “Repel the Marauders!” scenario, but with balsa wood and thick card as the main materials, making them will be both easy and cheap.

The final page of this issue takes a look ahead at the next installment of BGiME. We’ve got a Legolas model coming our way, making our collection of Fellowship minis a third of the way finished, rules for ranged weapons such as crossbows and throwing axes, a scenario where Legolas fights Moria goblins to rescue Frodo, and instructions for creating trees and forests on your tabletop. If you like elves, this sounds like the issue for you!

Friday, June 17, 2016

BGiME #6: Making Ruins

I’ve said it before, but constructing terrain—especially ancient and/or mysterious structures from the distant past—is one of my favorite aspects of the miniature wargaming hobby. As such, issue #6’s terrain-making chapter is my favorite one so far. The process of making more advanced ruins is presented in this issue. The techniques are simple and the results are terrific.

The “Defend the Ruins!” scenario found in this issue requires six pieces of terrain. Although any of the terrain from previous “Modelling Workshop” chapters would serve, I wanted to conjure up images of the early centuries of the Third Age and perhaps lingering relics from the Second Age of Middle-Earth in my games. So an even half-dozen ruins it must be!

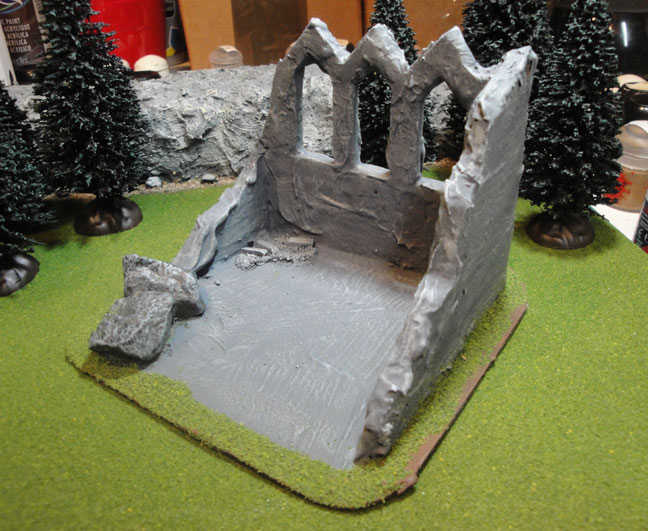
The ruins are made largely with thick cardboard cut into the appropriate shapes with a craft knife, then mounted on base of thin card. Spackle is applied to give the pieces texture and, once dry, each ruin is then painted and flocked. I did these six in about a week of intermittent work, but could have easily cranked them out in a weekend if I had need to.

These are the ruins in the early stages of construction. Masking tape is applied to the cardboard edges to conceal the corrugation and create the appearance of solid stone. Each entire piece is next slathered in spackling compound. I went a little heavy in places, resulting in “frosted cake” consistency that is a bit too thick, but they still look fine for the tabletop. I finally sprinkled “sprue rubble” and a few rocks I picked up while walking to add some more details to each piece.


Once the spackling compound dried, I applied a basecoat of black spray paint for coverage.


Each of the ruins was drybrushed with a dark gray paint, followed by another drybrushing of a lighter gray, then one last layer of drybrushed off-white to pick out the final highlights. The borders of each ruin was painted a chocolate brown and a layer of grass flock was applied to finish off the ruins.


Overall, I’m tremendously satisfied with the results. The cost was negligible, making them was quick, and the technique to craft them was simple. I can easily see myself using the same method to make more elaborate ruins for a city-centric miniatures wargame. With a little snow effect flocking, similar ruins would make a great addition to a Frostgrave gaming table. Next up, we’ll see how they look on the tabletop when we play through “Defend the Ruins!”