Thursday, November 12, 2015

BGiME #4: “Elven Attack”

With my Uruk-hai painted and a force of High Elves already present in my LotR SBG collection, it was time to see how they fared against one another. My friend and regular The One Ring player, Tom, would command the elves while I led the savage Uruk-hai to victory (or so I hoped). We set the table up to vaguely resemble a roadway passing through a hilly, wooded region, one with hedgerows on both sides of the thoroughfare, and got down to fighting.

The Uruk-hai outnumber the elves in this scenario and wear heavy armor that should be able to shrug off their arrows. My plan was to concentrate on getting five or more Uruk-hai off the Good Force’s edge of the board while preventing the stinking Rivendell contingent from slaughtering enough of my troops to prevent that. The only way to do this was to cover ground quickly, both to reach my objective and to slay the weaker and less armored elves.

My brutal Uruk-hai advance on the elves.

Tom's elven archers got lucky as the Uruks closed, dropping one of my troops moments before the forces clashed. Tom, smartly, backed his forces up, forcing me to cross more ground and suffer additional arrow attacks before I managed to pin down a few Rivendell troops and draw them into a fight.
Stand and fight, you elves!!!

The eagle-view shot of the same stage of the battle. Notice I've not actually engaged any elves yet.

I finally managed to charge some of the elves, forcing them to commit to a stand-up slobber-nocker. The archers, however, continued their slow fade back, firing arrows at any Uruk-hai not yet engaged in battle. I lost another Uurk to elven arrows, but managed to finally bring down a Rivendell elf. There will be tears in Imladris tonight!
Elven blood is spilled on ground fouled with orc blood!

Unfortunately, my objective was not to kill elves, but get orcs off the board. With the elves harrying me with arrows at every step, it wasn't going to be easy. This was not helped by my hasty reading of the rules either! I missed the rule about the role cover--such as hedgerows--plays in resolving missile attacks. Had I known this, I would have advanced in a much different manner, placing the hedges between me and the elven archers who caused so much havok on my orcs.
Arrows have taken their toll and only seven Uurk-hai remain.

Once the two sides were engaged, the Uruk-hai rolled pretty poorly and the Rivendell troops were able to keep me in check long enough to whittle my forces down. Fittingly, it was an arrow that ended the game, slaying the last  Uruk-hai needed to ensure an elven victory.
Victory by an Arrow.
Despite my lose, this was an entertaining scenario. Tom played well and it was nice having two larger forces face off against one another after the previous small skirmish. The fact that we missed the rule about cover means we can play this one again and adjust our tactics accordingly, making a fresh go at things.

With four battles under my belt, I'm enjoying the game and the learning process. It's a shame the game doesn't have much support these days and that the player base in my area is more concentrated on other miniature wargames. Despite these discouragement, I remain committed to both playing more (and have made it an early 2016 resolution to play far more miniature and hex-and-chit wargames in the coming year) and continuing to work my way through the Battle Games in Middle-Earth series of magazines. Next up, we dive into issue #5 with new minis, new rules, and creating a dedicated wargame table.

Thursday, October 29, 2015

BGiME #4: Making a Hill

I was overwhelmed this month completing work projects and putting the finishing touches on my long-delayed Stonehell Dungeon sequel and getting it released, but that doesn’t mean I haven’t been thinking about miniature gaming and the various elements that comprise it. I continued painting my Grey Company army and I’m also finishing up a warband of British Infantry for Muskets & Tomahawks. The paint, she goes ever on.

So I don’t watch October slip by without any posts, let me finish up coverage of Battle Games in Middle-Earth #4. We’ll pick up with—say it with me—my favorite aspect of miniature wargaming: terrain building.

This issue’s project is a modest hill crafted from expanded polystyrene (the pink stuff) and flock. Hills are one of the simplest pieces of terrain to create and they make your battlefield both attractive and provide armies with strategic advantages. Although they are easy to assemble, that doesn’t mean there’s no chance of error as we’ll soon see.

I decided to construct a three-tiered hill that could be divided into separate components to form individual hills. To add a little detail to the hillock, I created a stone outcropping from rocks I found while walking, painted appropriate colors.

My three-tier hill. Note the Grey Company and British Infantry in the background.


A natural rocky outcrop or an ancient cairn?
As I mentioned in my post about making hedgerows, there were two issues I encountered in crafting the hills. The first was the choice of base color. The instructions in Battle Games state to use your green paint pot for base coloration. This shade of that green is lighter than the flock I used and it’s evident in the final result. This lends an unrealistic appearance to the hill. A darker base, such as GW Scorched Brown or a chocolate brown craft paint would be much better. That’s the approach I’ll use from now one regardless of a project’s instructions.

The base coat is visible, making for a patchy hill.
The second problem in assembling my hill was my choice of PVA glue. Again, as I learned in my hedgerow project, there’s a world of difference between white glue and wood glue when it comes to gluing flock down. The watered down white glue simply doesn’t have the strength and adhesive properties of wood PVA glue and I had to flock the hills several times to ensure a decent layer of green. In the end, the hills still show bare patches, especially along their bottom edges where the base paint is clearly visible. I’ve learned my lesson. Actually, I’ve learned it again because I once knew to use wood glue over white glue, but clearly forgot as my skills grew rusty. But that’s one of the reasons I embarked on this project: to improve my painting and crafting skills.

Note the lack of flocking along the bottom edge of the topmost tier.

Next up, we’ll see how my Uruk-hai faired against the Elves of Rivendell when the forces of Good and Evil collide in the “Elven Attack” scenario.

Saturday, September 19, 2015

BGiME #4: Painting the Uruk-hai

Build me an army worthy of Mordor. -- Sauron
Evil now has a truly terrifying force to field against the Free Peoples of Middle-Earth: the Uruk-hair of Isengard. Painting these models was a breeze, and I had them table-ready in a day. If anyone is looking for a quick-to-prepare army for the SBG, a load of Uruk-hai is the way to go.

Painting was mostly dry-brushing the armor various shades of metallic silver and painting the flesh a dark brown. A quick basing of sand and autumn static grass and the forces of Evil were ready for the battlefield

First up are the pikemen--or pike-uruks to be precise. Their long-hafted weapons allow them to gang-up in battle, supporting an allied model from a distance.


Next are the sword-uruks who enjoy an increased Defense score against opponents thanks to their shields. There's no rules for hurling a Uruk-hai shield to pin a Ranger against a tree in the RAW, and as I'm fielding a Grey Company force, I'd glad at its absence!


Here are the assembled forces of Isengard marching on Helm's Deep. This force costs 100 points under the last edition of the SBG rules, making it the backbone of a 500 point Isengard army.


Next up, we'll see how the Uruk-hai do against the Elves of Rivendell when we play out the scenario, "Elven Attack." See you soon!

Wednesday, September 16, 2015

Battle Games in Middle-Earth #4 Overview

With our first metal miniature in our collection painted and a number of Good and Evil plastic models to war with one another, it’s time to expand our forces with some of the nastiest bad guys in Middle-Earth: the Uruk-hai. They are the focus of Battle Games in Middle-Earth #4.

As always, the magazine begins with “Guide to Middle-Earth.” This issue’s entry describes the origins and characteristics of the dreaded Uruk-hai. From their creation by Saruman to their unique ability among orcs to function well in daylight, we learn the role the Uruk-hai play in the machinations of Sauron and the Enemy’s plans for the Free People of Middle-Earth. The Guide postulates a scenario where a force of elven scouts from Rivendell encounter a band of Uruk-hai en route to Helm’s Deep and attempt to prevent them from bolstering Saruman’s forces. This hypothetical event will be further explored during the Battle Game chapter later in the issue.

Next up is “Playing the Game.” Last issue, we learned new rules regarding the Priority and Move phase and how they impact the basic game rules the magazine had taught us so far. Now it’s time to further delve into the Fight phase and see what complexities exist for when forces clash in close combat. This issue demonstrates the Wound Chart for the first time. In previous battle games, the scores models needed to roll to wound an enemy were presented for each figure. Here we now see the table used to determine these scores and are told the means to calculate such numbers for ourselves (the winner’s Strength cross-referenced with loser’s Defense). We learn that when these scores are widely divergent, an attack might need to roll the dice twice on a strike, achieving a 6 on the first die, than a 4, 5, or 6 on the second to cause a wound. This came into play in the previous issue’s scenario and it’s now clear exactly how bad Frodo was outclassed by the Ringwraiths.

The methodology of breaking up complex battles into bite-sized, easily-resolved combats is taught with clear photographs of models to demonstrate the intricacies of such divisions. The rule for trapped models is given; in situations where a model losing a fight cannot retreat the usual 2cm/1” required, the winner gains twice as many chances to inflict a wound. This situation occurred in our very first battle game so it’s nice to know how to handle it now.

All these new rules and modifications are grouped with the collected Fight phase rules presented in previous issues, giving the reader a “one-stop shopping” chapter to reference during SBG matches.

The “Battle Game” chapter in this issue concerns a class between a group of High Elves from Rivendell (the ones we assembled and painted in issue #2) and a band of Uruk-hai. As previously noted, this scenario, “Elven Attack,” is set shortly before the Battle of Helm’s Deep. It presents a possible event where Elrond dispatched scouts to buy the men of Rohan more time to rally their forces and these scouts engaged Uruk-hai headed to the battlefield. The winning conditions require Good to slay at least six of the ten Uruk-hai, while Evil needs to move five Uruk-hai off the opposite end of the board. The scenario is an interesting one: The elves are slightly outnumbered and the Uruk-hai are stronger, but the forces of Good are the only ones with missile weapons. How it all turned out when we played through this battle will be covered in a future post.

The “Painting Workshop” features techniques to paint our new Uruk-hai troops. We’ve come a long way from our efforts with the Moria Goblins back in Battle Games in Middle-Earth #1. By now, we’ve learned how to mix paints to achieve different colors aside from the seven paint pots we own (assuming we’ve been relying solely on those included with each issue of the magazine), how to drybrush models, and how to use flock or static grass as a simple basing technique. We add a new trick to our repertoire this time around: “silver edging.” This gives metal weapons and armor a sharp and menacing look, something no Uruk-hai should be without!

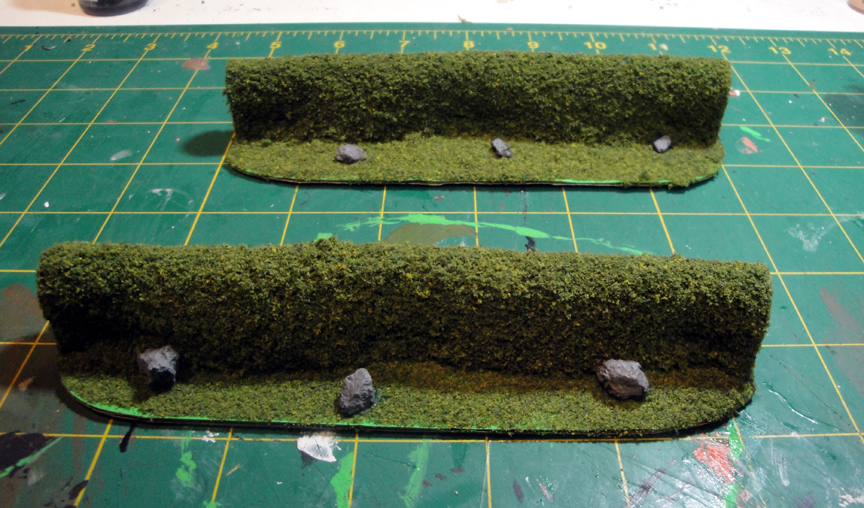
We now come to our final chapter, “Modelling Workshop.” This issue it’s time to rise above the tabletop as we learn how to fashion simple hills for our SBG and other miniature wargames. The steps to create polystyrene hills are presented in clear, easy-to-follow steps, allowing even the most ham-handed tabletop wargamer to make any number of grassy hills to adorn the battle board for a fraction of what commercially manufactured ones cost.

Looking to the back cover, we see that another metal model, the Uruk-hai captain, Lurtz, will be arriving in two weeks, providing us with another hero (albeit an Evil one) to add to our collection. With our squad of Uruk-hai awaiting his arrival and orders, what hope do the forces of Good have? We’ll see in the weeks ahead!

Next up, let’s paint some orc.

Friday, September 11, 2015

BGiME #3 “Pursuit of the Ringwraiths” Battle Report

With some freshly-painted Frodos in my collection, it was time to try out the "Pursuit of the Ringwraiths" scenario presented in BGiME #3. I put the call out and two of my The One Ring players answered, meeting prior to our Sunday night TOR game. We had enough time to run the scenario twice.

Game #1 saw me playing Frodo and Aragorn, while Tom and Dave took command of the Ringwraiths. All I had to do was get Frodo off the board to achieve a victory for Good, but I had to contest with the debilitating power of the Ring. Each turn I had to roll 1d6 and if the result was a "6," Frodo could not take any action during the Move phase as he struggled with the Ring. With a slow movement rate, I knew even one lost turn could prove devastating...and it did. Aragorn rushed to Frodo's aid from the opposite side of the board, but Frodo was forced to contend with the Ring's power on the second turn, allowing the Nazgul to swoop down upon him. Facing off against three Ringwraiths quickly spelled Frodo's doom and the Ring fell into Sauron's hands soon after the flight from Bree. Middle-Earth was doomed.

Starting positions. Aragorn is a long way away!

And just like that, it's over.
Game #2 was a much better scenario. Tom and I took control of the Ringwraiths while Dave commanded Frodo and Aragorn. This game could have gone either way in the final few rounds, but a poor tactical decision lost the game for one side.

Pursued by Nazgul, Frodo flees into the Wild

"Stupid short hobbit feet!" The Ringwraiths close in on Frodo

"Hold on, Frodo! I'm on my way!!!"

A close-up on the detailing I did on my Ringwraiths. I'm pleased how they turned out.

Frodo faces three Nazgul as Aragorn fends off the Witch-king.

Frodo flees the battle as Aragorn tries to cover his escape! Alas, two Nazgul pursue.

A Ringwraith is slain by Aragorn as Frodo makes for safety!

The Ringwraith cannot slay Strider, but he cannot keep them all in check.

Frodo continues his flight as Aragorn tries to keep the Nazgul from pursuing.

The Ringwraiths move in from both sides to trap the Ringbearer.

What?! Frodo, you're going the wrong way!

The Ringbearer falls.
The forces of Good came really close to winning this one, but Frodo, trying to run around a Ringwraith, got forced back the way he came, moving him away from the victory line. When Aragorn got bottled up in melee, the rest of the Nazgul managed to surround Frodo and swiftly brought him down, ensuring Evil once again regained the Ring.

As I mentioned in the overview of this issue, this scenario was a tough one for the forces of Good. Outnumbered, outrun, and facing strong enemies, the Ring's influence easily turned the tide of battle when it asserted itself early in the first game. In the second game, Strider's interference and use of control zones to block the Nargul allowed Frodo to gain some distance, but a single misstep was all it took for Evil to catch up and put Frodo down. Despite back-to-back wins, this is an interesting scenario and I'll likely play it again.

Upper Anduin Vales Player's Map

My The One Ring campaign has largely consisted of playing through commercially-written adventures. This is due to the lack of preparation time available to me and my desire to become familiar with the rules, tone, and challenges of The One Ring compared to say Dungeons & Dragons. Recently, however, the company has become embroiled in events of my own devising and have headed north away from their regular stomping grounds in the East Anduin Vales. They are seeking a purported hoard of treasure that was carried off by servants of the Witch-king and secreted away on the eastern side of the Misty Mountains during the fall of Angmar. The trail has brought them to the Sceadudene, the Vale of Shadow.

In detailing this region, I've relied heavily on the material presented in The Heart of the Wild supplement, but have added my own flurishes. To better visualize the area and find suitable homes for all the region's interesting locations and NPCs, I took the Loremaster's map of Wilderlands and zoomed in on the Sceadudene. I intend to use this more detailed version as both a player's handout map and as a hexcrawl map for my side of the Loremaster's Screen. Depending on what leads, legends, and rumors the company pursues in the future, the focus of the campaign might shift to this region and those beyond. Even if the PCs seek other adventures, a SBG miniatures campaign might be fun to set here and a smaller-scale reference map would certainly be useful to have on hand should that come to pass. I present it here for your perusal and/or use. Click to enlarge.


There is no compass rose or scale, but North is situated at the top of the map and each large hex is 10 miles as per the Loremaster's map from The One Ring. Smaller hexes are 2 miles each.

Sunday, August 23, 2015

BGiME #3: Creating a Hedgerow

The “Modelling Workshop” project in Battle Games in Middle-Earth #3 is the hedgerow, a common obstacle/barrier that’s simple to make and looks good on the game table. All you need is a green scouring pad, some flock, cardboard, glue, a little paint, and you have a pair of nice terrain pieces. With an ultimate plan to run “The Scouring of the Shire” one day, I figured I’d best become familiar with making these and sat down to assemble out a pair of hedgerows for my table.


The hedges are easy to create, but I did encounter two problems in making them. The first was my own fault, while the second was due to a step in the instructions. The first thing I noticed is that I was running into trouble flocking the hedgerow and base. I’ve made terrain utilizing flock in the past—albeit a while ago—and didn’t recall having as much difficulty at that time. I finally pinpointed the cause of my difficulty, but it unfortunately came after I’d had put the project to bed. The reason the flock wasn’t adhering as well as it had in the past was that I was using white glue mixed with a ratio of water as an adhesive. On previous projects I used a wood glue/water mix with much better results. Not all PVA glues are the same when it comes to scratch-building, it seems, and I’ve noted this for future reference. 

The second issue was that the instructions say to paint the base of each hedgerow green. In my opinion, I don’t believe using green as a base color when you’re going to flock the piece is the best way to proceed. In other terrain pieces, I’ve always used a dark, almost black, brown as a basecoat for areas I intend to cover with flock. It provides a better look, giving the illusion of rich soil underneath the green grass. Combined with the less-than-perfect flocking, the green basecoat is sloppy to my eyes on the finished piece.

You can see where the flock failed to stick in this overhead view.

The light green base coat proves problematic when the flock doesn't stick
All-in-all, however, it’s a good start for a terrain collection. I’ll need to make six to eight more of these in the future to have a full set of hedgerows for my table, but given the lessons I’ve learned and the experience I’ve acquired to make them, that’s a task that will take one rainy winter weekend to complete.

Next up, we pit Frodo against the Ringwraiths and things turn bad very quickly.

Saturday, August 22, 2015

BGiME #3: Painting Frodo(s)

I knew when this crazy project began that I wouldn’t always have the model included with each issue in my own collection to paint as per the instructions given in Battle Games in Middle-Earth magazine. There would have to be substitutions made, especially—as I initially believed—when it came to the Fellowship. The models included in the various BGiME issues come from the original Fellowship of the Ring boxed set, which is something I didn’t own at the time I embarked on this weird journey. My intent was to substitute my plastic Fellowship models from the Mines of Moria starter set. 

Original Fellowship of the Ring set from Games Workshop (2001)

Happenstance and good friends intervened on my behalf, however. In a three-month period, I had not one, but two complete sets of metal Fellowship minis fall into my lap, presenting me with a bevy of Frodos to choose from. I had already painted my Mines of Moria plastic Frodo according to the instructions included in issue #3, leaving me with the option of doing one of the metal models in the same way and remaining true to the magazine’s choice of models or giving them both a more advanced detailing. I chose the latter, intending to keep one set and present the other as a gift to someone I know who shares my love for the Professor’s work (Shh! That’s a secret!). So, rather than one painted Frodo, I find myself with three. Allow me to present them to you:

Frodo #1: Mines of Moria plastic miniature (painted using technique described in BGiME #3)


Frodo #2: Fellowship of the Ring metal model (I used a wash to detail the facial features a bit more)


Frodo #3: Fellowship of the Ring metal model (no wash used)


The Fellowship of Frodos (Do you call a group of hobbits a “pipe of hobbits?”)


I think I’m most partial to the washed version but only a fraction more so than the unwashed version. I’m happy with the lot of them and look forward to placing them in dire straits many times in the future.