Showing posts with label painting. Show all posts

Saturday, February 10, 2018

BGiME #10: Batch Painting

This issue’s project is a bit of repeat. Back in issue #4, we received our first sprue of Uruk-hai to paint, doing so using the skills and paints we had at that point. Now, a few months later (in the original release schedule, anyway), we’re given 10 more fighting Uruk-hai to prepare for the tabletop. Issue #10’s “Painting Workshop” is primarily concerned with getting these half-score models finished and ready to fight as quickly as possible.

The Uruk-hai are some of the easiest SBG models to paint. A good spray primer has them ready for their base coats in no time flat, and the majority of their armor and weapons can be dry-brushed a dark metallic. A little edging with a brighter silver paint gives the impression of sharp edges and wear, then a coat of dark flesh for skin tone and you’re ready to base them and field them. The servants of the White Hand are pretty formidable with their heavy armor and high Strength scores. I’d personally recommend them to any newcomer wanting to play the SBG quickly.

Below are the ten Uruk-hai I painted for this issue. I’ve also included a comparison photo showing one of the models I painted for issue #4 alongside a more recent paint job. In this case, you can see I’ve started doing a little more work on my bases, using an Earthshade wash on the sand to make it look more like soil and not a day at the beach for the Uruk-hai. The newer paint job is also brighter. I believe this stems from me using a lighter metallic as a base and instead washing the metallic with a sepia wash to age the armor. The differences aren’t too great, however, and I can field both on the same table without them distracting from one another.


Sunday, December 31, 2017

BGiME #9: Painting the Uruk-hai Captain

From a painting point of view, I really enjoy the various Uruk-hai models. They can be quickly painted and deployed on the gaming table, and they're fearsome looking minis. If I was prone to playing Evil, I'd probably go with an Isengard force.

The Uruk-hai Captain was a fast paint and ready to lead his forces against Rohan in a day. There's nothing complicated about the figure and, being largely armored, was mostly drybrushed metallics. He then received a coat of Dark Flesh and was good to go. Taste the man-flesh, of Captain of Evil!


Sunday, November 12, 2017

BGiME #8: Painting Legolas

I own a plethora of Legolas (Legoli?) models. As is my wont, I decided to paint two versions of the Woodland Prince. One is a plastic version from my Mines of Moria starter set, and the other is a metal model from the original Fellowship of the Ring boxed set. 

Since the Battle Games’ instructional painting sections, at least for now, are aimed at beginning painters, I don’t mind if my plastic Fellowship heroes are done in a most basic tabletop standard fashion. My metal heroes, however, I’d like to be of better quality. So with that caveat in mind, here’s the two Legolas models I now have painted and ready to take the table.


Here's my metal version:


As always, I don't foresee any Golden Demon awards in my future, but I'm pretty proud that I can do a tolerable job of painting my wargaming forces. Legolas, in whatever guise I choose to field, is ready to take on some Moria Goblins in this issue's scenario. Let's hope he fares well!

Friday, September 15, 2017

BGiME #7: Painting Warriors of Rohan

This issue gives us our first Good warriors from the Third Age, a force that features prominently in both The Two Towers and The Return of the King. Packaged with this issue when it was released as 12 Warriors of Rohan. These dozen models provide a solid core to build a Rohan army around and will be further augmented with warriors and heroes in future issues.

I took a few liberties with the painting instructions included in this issue. I wanted a deeper green for the Rohan cloaks and engaged in some minor highlighting and detailing. The results are what you see below.


I painted these before I started shading the bases. Previously, I textured them with sand, but I've discovered that adding a brown wash or Earthshade really improves the final result. Overall, however, these models are pretty good and are more than adequate for tabletop standard. 

Next up: Rohan vs. the Uruk-hai!

Friday, June 17, 2016

BGiME #6: Making Ruins

I’ve said it before, but constructing terrain—especially ancient and/or mysterious structures from the distant past—is one of my favorite aspects of the miniature wargaming hobby. As such, issue #6’s terrain-making chapter is my favorite one so far. The process of making more advanced ruins is presented in this issue. The techniques are simple and the results are terrific.

The “Defend the Ruins!” scenario found in this issue requires six pieces of terrain. Although any of the terrain from previous “Modelling Workshop” chapters would serve, I wanted to conjure up images of the early centuries of the Third Age and perhaps lingering relics from the Second Age of Middle-Earth in my games. So an even half-dozen ruins it must be!

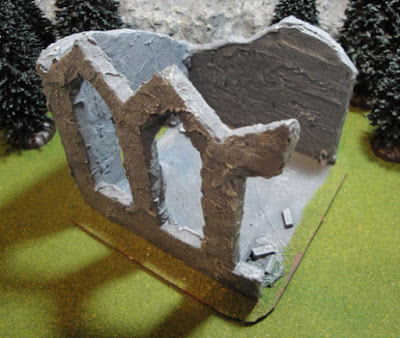
The ruins are made largely with thick cardboard cut into the appropriate shapes with a craft knife, then mounted on base of thin card. Spackle is applied to give the pieces texture and, once dry, each ruin is then painted and flocked. I did these six in about a week of intermittent work, but could have easily cranked them out in a weekend if I had need to.

These are the ruins in the early stages of construction. Masking tape is applied to the cardboard edges to conceal the corrugation and create the appearance of solid stone. Each entire piece is next slathered in spackling compound. I went a little heavy in places, resulting in “frosted cake” consistency that is a bit too thick, but they still look fine for the tabletop. I finally sprinkled “sprue rubble” and a few rocks I picked up while walking to add some more details to each piece.


Once the spackling compound dried, I applied a basecoat of black spray paint for coverage.


Each of the ruins was drybrushed with a dark gray paint, followed by another drybrushing of a lighter gray, then one last layer of drybrushed off-white to pick out the final highlights. The borders of each ruin was painted a chocolate brown and a layer of grass flock was applied to finish off the ruins.


Overall, I’m tremendously satisfied with the results. The cost was negligible, making them was quick, and the technique to craft them was simple. I can easily see myself using the same method to make more elaborate ruins for a city-centric miniatures wargame. With a little snow effect flocking, similar ruins would make a great addition to a Frostgrave gaming table. Next up, we’ll see how they look on the tabletop when we play through “Defend the Ruins!”

BGiME #6: Painting Aragorn, Hero of Helm's Deep

Far more than a King...he is a Man who may command me. --Theoden
Had we been buying Battle Games in Middle-Earth as they were released on a fortnightly schedule back in 2003, issue #6 would have been an important one. With this issue, we could now discard the cardstock version of Aragorn we'd been using and replace him with a metal model as he truly deserves. This won't be the last Aragorn we paint before we come to the end of the BGiME line, but this one serves as a good place to begin.

I want to take a moment to remind the readers that, as part of my exploration of the Battle Games series, I'm painting each issue's model(s) exactly as instructed in the "Painting Workshop" section. In many cases, these means that the model won't be up to my normal standards, but it should be at least tabletop ready. I'm no Golden Demon winner, but I like to hope my skills are a bit better than the introductory level ones the readers are assumed to possess in the early issues of Battle Games in Middle-Earth.

With that in mind, allow me to present Aragorn, Hero of Helm's Deep:

Aragorn rushes to defend the Hornburg!

Apologies for the blurriness.

"I would have followed you, my brother... my captain... my king."
Even painted according to the "Painting Workshop" techniques, the final result isn't particularly poor and Aragorn makes e a nice (and powerful)  addition to the readers' growing miniature forces. We'll revisit this particular model and paint job in issue #61. Maybe we'll see a marked improvement over this beginning painting then. In the meanwhile, I think I'll shelve this version of Aragon and use my better painted model on the tabletop.

Thursday, April 14, 2016

BGiME #5: Painting Lurtz

Hunt them down. Do not stop until they are found. You do not know pain, you do not know fear. You will taste man-flesh! – Saruman 
 The Uruk-hai from issue #4 need a leader, a savage Evil Hero armed with bow and sword to command them. They need Lurtz!

Like the Uruk-hai themselves, Lurtz was a quick paint and I had him ready for the tabletop in a flash. The dark Uruk flesh and filthy metal lends him a grim appearance, matching nicely with the color scheme of the armored fighting Uruks that he’ll be leading. The “White Hand” war paint is a small splash of brightness amongst the muddy tones. I skipped the painting guide’s instructions to do the base green with flock, preferring the brown base with sand and desiccated grass as I felt this better suits an Evil model.


While not a equal match to Aragon, both in the movie and in the SBG, Lurtz nevertheless would make a suitable commander for a 500 point war band should I need to field some Isengard troops any time. We'll see how he fares on the tabletop in our next post, when we play through the "Hunt of the Uruk-hai" scenario.

Saturday, August 22, 2015

BGiME #3: Painting Frodo(s)

I knew when this crazy project began that I wouldn’t always have the model included with each issue in my own collection to paint as per the instructions given in Battle Games in Middle-Earth magazine. There would have to be substitutions made, especially—as I initially believed—when it came to the Fellowship. The models included in the various BGiME issues come from the original Fellowship of the Ring boxed set, which is something I didn’t own at the time I embarked on this weird journey. My intent was to substitute my plastic Fellowship models from the Mines of Moria starter set. 

Original Fellowship of the Ring set from Games Workshop (2001)

Happenstance and good friends intervened on my behalf, however. In a three-month period, I had not one, but two complete sets of metal Fellowship minis fall into my lap, presenting me with a bevy of Frodos to choose from. I had already painted my Mines of Moria plastic Frodo according to the instructions included in issue #3, leaving me with the option of doing one of the metal models in the same way and remaining true to the magazine’s choice of models or giving them both a more advanced detailing. I chose the latter, intending to keep one set and present the other as a gift to someone I know who shares my love for the Professor’s work (Shh! That’s a secret!). So, rather than one painted Frodo, I find myself with three. Allow me to present them to you:

Frodo #1: Mines of Moria plastic miniature (painted using technique described in BGiME #3)


Frodo #2: Fellowship of the Ring metal model (I used a wash to detail the facial features a bit more)


Frodo #3: Fellowship of the Ring metal model (no wash used)


The Fellowship of Frodos (Do you call a group of hobbits a “pipe of hobbits?”)


I think I’m most partial to the washed version but only a fraction more so than the unwashed version. I’m happy with the lot of them and look forward to placing them in dire straits many times in the future.